How-To
Store
Additional software
Add-on Creation
Developing the add-on
In the first step, the add-on needs to be developed according to your ideas. There are the following requirements:
- The add-on is installed as a sub-project for the customer. Therefore, this must have the structure of a WinCC OA subproject.
- If the document requires [techAdd-onName] the technical name of the add-on should be used.
- The technical name of the add-on consists of the following components:
- [abbreviation Provider] [add-on name] (Important: replace spaces with )
- Example: SLT_Installation_Layer
- The separation between add-on name and technical add-on name makes it possible to use several “identically named” add-ons from different providers in one project. It is also possible to rename an add-on in the store without having to rebuild the entire subproject structure.
License Exam Preparation
There is a control extension that should be used in the control code to determine if there is a required license for the add-on.
The functions that are available and how they are used are described in the following chapter: SLTLicense Control Extension.
For EWOs or other Control Extension there is a static lib that should be used. This will be shipped on request. Please send an email with the subject “Static Lib” to the following e-mail address: info@slooptools.com.
Required Files
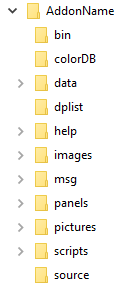
The following files must be present in each add-on:
- Icons for system management under the following paths (The sizes of the images are included in the paths):
- pictures/SysMgm/16×16/[techAdd-onName].png
- pictures/SysMgm/40×40/[techAdd-onName].png
- Image (400×400) to be able to display the add-on in an “Add-on Information” panel
- pictures /[techAdd-onName]/[techAdd-onName].png
Upload-Vorbereitung
Panels, scripts and libs must not be manually encrypted. Reason for this is because there are checks done in the Quality Gate with these files. However, these are encrypted before delivery in the Quality Gate. Files that should not be encrypted must use the following comment headers: // SLT: NO_ENCRYPT. This comment must simply be inserted at the beginning of the file. Non-add-on relevant files must be deleted (for example, unneeded .bak files). The following folder of the project structure must also be deleted:
- config ( config.level is allowed and will not be deleted )
- log
- db (exception are add-ons that can be delivered as complete projects. Whereby we recommend not to deliver a database, but to import the data into the existing database)
Quick guide to packing the add-on
- Create folder or WinCC OA project- name:[techAdd-onName]
All required files and folders are copied into this folder as a WinCC OA subproject structure, if this is not yet a subproject.
Then, the folder is packaged in a zip package. The package name is independent of the content name of the ZIP package and can be used for internal purposes or have the same name. Example: Installation_Layer.zip contains a folder named SLT_Installation_Layer in which the sub-project structure exists. At a later date, there will be a test folder next to the [techAdd-OnName] folder. This folder will contain the additional tests for the Quality Gate.
- The created ZIP package is ready and can be uploaded to the SloopTools provider backend.
Upload the add-on
The ZIP package created in the last chapter must be uploaded via the SloopTools provider backend. Prerequisite for backend access is the accessor authorization for at least one company that has been promoted to the provider. Starting a business is possible in the store through My Account->My Company. For more information, see the online documentation General-> Configuration-> My Company.
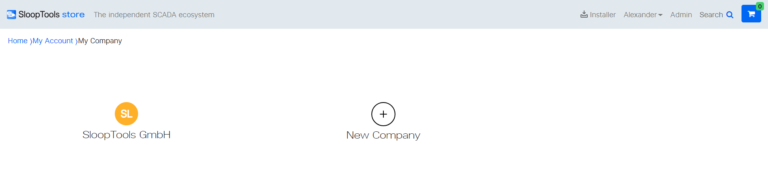
The creator of a company is automatically accessor and has all the rights to edit the company. It is also possible for this company to buy licenses and activate them. More accessors, so team members can be added at My Company -> Accessors.
In order to get the provider status and thus to have access on the back-end, the user must send SloopTools a “Upgrade to Provider” request.
This request is not processed automatically and may therefore take a little time. As soon as the upgrade has been carried out, the admin button will appear next to the user in the upper right area of the store.
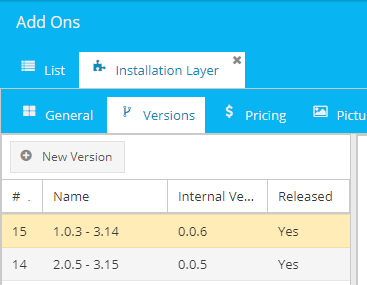
Upload
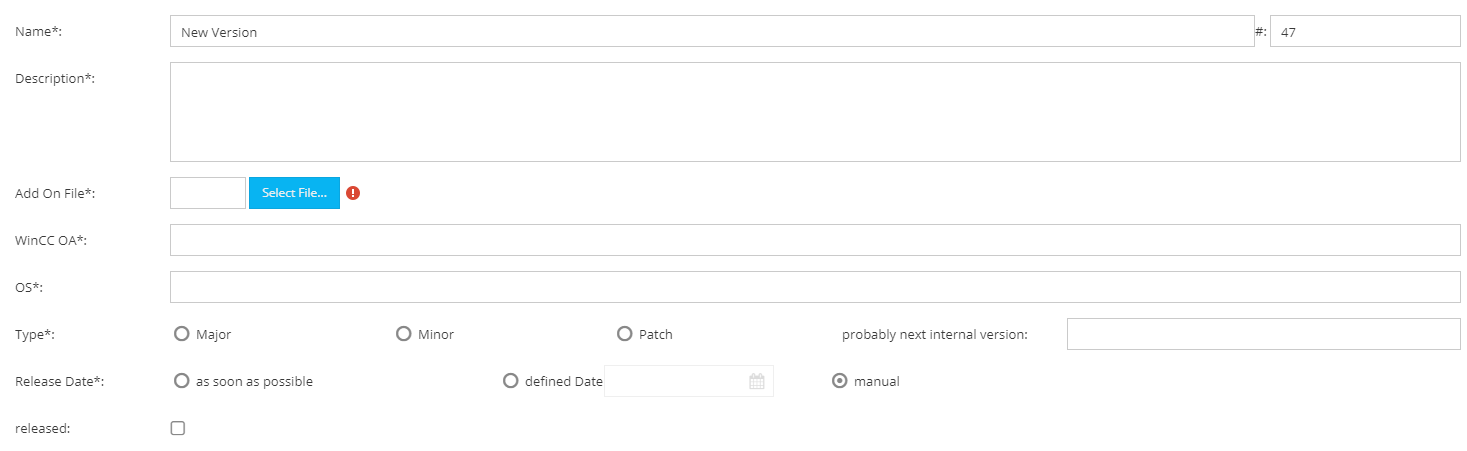
In the backend, the user must select the menu item Add-ons and either create a new add-on there or select an existing one to update it. The upload of the version is then in the menu item “versions” of the add-ons. Then a new version must be created. Subsequently, a new version must be created. For the newly created versions, all required fields must be completed.
Finally, you have to select the Zip package under Add On File and save the version. During this process, the Zip package is uploaded, the entered information is saved and the Quality Gate is started with the add-on.
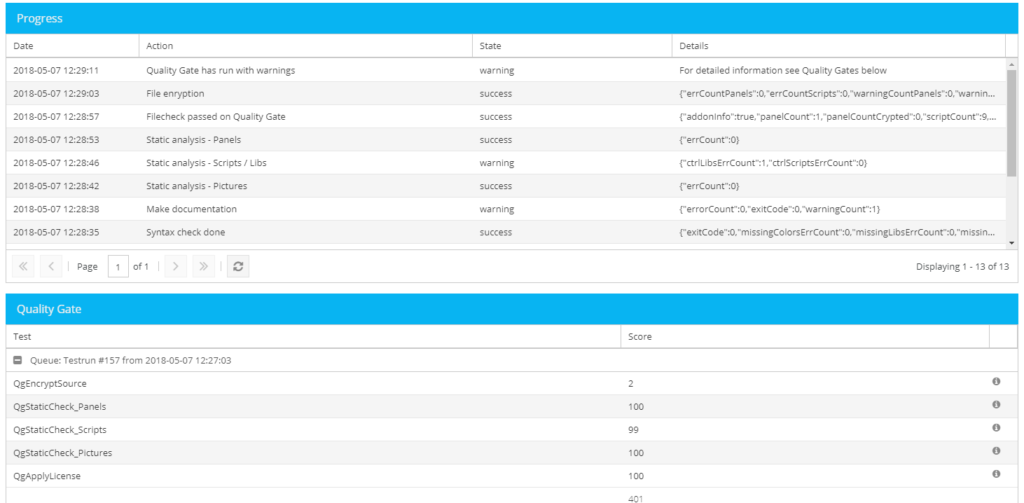
Quality Gate
After the quality gate returns a positive result, it is possible to release the add-on. If the Quality Gate returns a negative result, the errors displayed in the result must be corrected and the add-on must be re-uploaded.
Install the add-on
To check whether all processes have worked, you must now install and test the add-on. The following steps are necessary:
- [Store] Add the add-on via the store via a “Demo” button to the account.
- [Installer] If the installation layer is not yet installed, install it. (If the installation layer is not automatically added to the account in the installation, it must be purchased in the shop, there are no costs.)
- [Installer] install Add-on via the “Add-ons” tab.
- [Installer] Add the add-on to installed projects installed via the “Projects” tab.
- [Installer] Assign a license via the “License” tab to the add-on.
The add-on can now be tested with the projects to which it has been added.